Lest you think I don’t support video collaboration in conference rooms, I actually love it! I just don’t think an expensive telepresence setup is needed for a successful conference. For a sliver of a fraction of a percentage of the cost, you can have a great conference room setup using a quality desktop collaboration solution (such as *ahem* VSee) and off-the-shelf equipment.
We plan to make a series of this with the future installments provided by fellow VSee employee Julio, who has experimented with many different trial-and-error configurations of room setups. Some should be pretty amusing, especially the failed experiments!
Here, however, I’ll present the basic setup for both rectangular and round tables.
Suggested Room Layouts
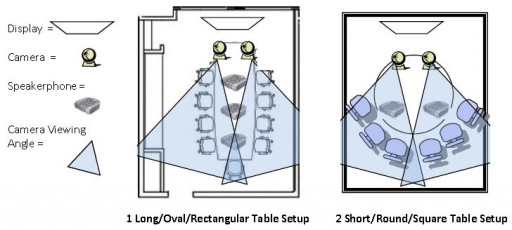
There are several solutions for camera and display placement. For the standard conference room layout, we suggest the following:
On a long table, whether a rectangle or oval, if possible, place the cameras on one narrow end, positioning each camera to view just over half the table (1). Allowing for some overlap ensures remote participants can see all room participants. Do not place chairs next to or behind the cameras. Do not worry if the angle of view doesn’t include everyone; the PTZ function of the cameras (see our camera recommendations below) will allow the remote participants to scan the entire table. Place the display on the wall or the end of the table behind the cameras.
For square or circular tables, you will want the participants to line up on the opposite side of the table from the cameras (2). Depending on the size of the table, it may be important to place the cameras on a surface some distance from the table to ensure everyone is within the field of vision. Whatever you use for the display, wall, screen, monitor or HDTV, attempt to place the cameras beside or along the sightlines between the seats and the image. Move cameras to the display edges if using a projector on the table. This way the cameras will not cast shadows onto the screen or wall. Whenever possible, use projectors that are mounted to ceilings or high places so the cameras may be placed more directly along sightlines.
We recommend for a display either an HDTV monitor or a ceiling/wall-mounted projector with a screen. Most HDTVs come with VGA and HDMI inputs, to which most desktops and laptops may connect with. For the screen resolution on your computer, use 1360 x 768 pixels. This will allow the projector or HDTV to resolve the picture at either 720p or 1080p in 16:9 aspect mode.
Either a laptop or desktop computer may be used to host room-based meetings. Netbooks are not recommended as room-based system hubs due to the likely number of video streams.
You’ll probably want to use two or more external USB pan/tilt/zoom (“PTZ”) enabled webcams. We recommend the Logitech Orbit or Sony EVI series cameras on this page. PTZ will let the remote participants adjust who they’re looking at during the discussion.
We also recommend using an external USB speakerphone—our preference is the Jabra 410 (or 510 for Bluetooth support)—to ensure echo cancellation and appropriate levels of gain and volume. If you have a larger area to cover, you may want to try multiple Phoenix Duet Executives (not the MT202) or the Phoenix Quattro2. The Quattro2 is designed for larger conference table use and may be daisy chained (“ganged”). The Duet Executives are also capable of ganging to allow multipoint placement throughout a room without creating interference or echoes. Please note the Duet MT202 does not have ganging capability.


Hey, I really liked your post on how to set up a video conferencing room. I wish to get some more details do you think we can get in touch?
hoping to hear from you.
-Raman
How do you get the input from two cameras into one session?
Hi Tom! Simply go to your self-view video window, click on the gear icon and select “Add Another Camera.” Please note, however, that auxiliary camera feed is currently a paid feature. Thanks!
Hi, this is regarding Anne’s last comment above. If two cameras are in session simultaneously “covering the same room”, then there will be some overlap or “capture of a region” which is common to both. Your conference room setup with the two cameras looks very interesting – but I wonder how would you “stich” together the two regions so that the common region is not repeated; unless, of course, you plan to display the two streams on two separate TVs. Also, can you email me the cost of your modified camera (the c920 you mentioned with the extra zoom/lens attached in front – as it shows in the picture above). Thanks.
Also, the c920 has pathetic focus/sharpness for people who are more than, say, 1.5 meters away from the camera. I can imagine that is why you have put the two lens systems in front of the c920 – probably to change the focus/sharpness to a larger object distance besides adding to field of view (an automatic consequence of modifying focal length). If that is working well (for focusing on people > 3 or 4 m from camera), then I am definitely interested in finding out the price of your modified cams (Sony is too expensive) 🙂
It’s up to you whether you want to display the 2 videos side by side on a single monitor or on 2 separate screens. Either works. You can adjust the camera or side by side videos so that the common region overlap is almost nil.